If you thought that delicious focaccia with its airy texture was complicated, think again! The secret to that soft, pillowy interior is surprisingly simple: give your dough a long, cold rest in the fridge. This relaxed fermentation develops complex flavors and a beautiful, bubbly crumb that’s irresistible.
Contents
- How to Make Focaccia Bread
- How to Make Focaccia Bread
How to Make Focaccia Bread
Love homemade bread but pressed for time? Focaccia is your friend. Even if you’re new to baking, this is the perfect place to start. It’s basically a no-knead 4-ingredient dough you just mix together. You’ll be amazed at the golden, olive oil-crusted results with minimal hands-on time. Let me walk you through how easy it is!
Beyond the Basics
The beauty of focaccia lies in its versatility, but there are a few basic techniques that go a long way:
- Baking Pan: A classic 9×13 inch baking pan is perfect for a focaccia slab.
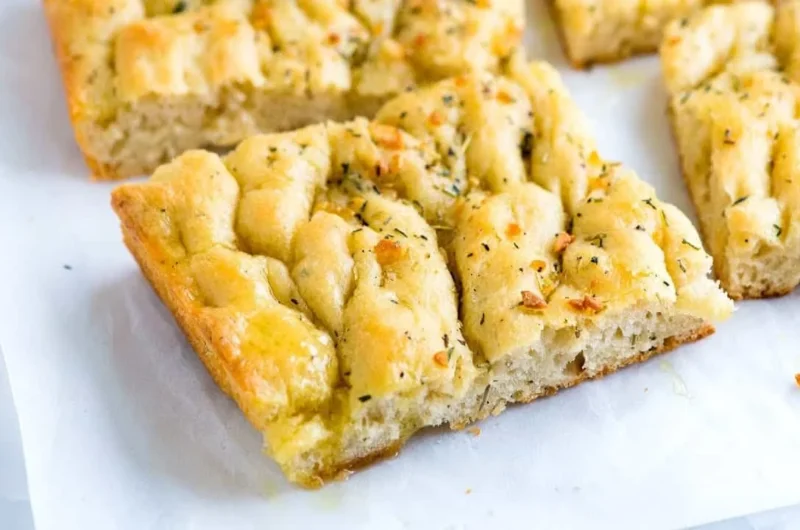
- Dimple Power: Use your fingertips to dimple the dough gently (no tricky scoring or shaping techniques). This creates those signature nooks and crannies for pools of delicious olive oil.
Focaccia truly falls into the high effort-to-reward category. If you’re intimidated by bread baking, this recipe is a fantastic place to start due to its simplicity and delicious flavor. Many recipes are adapted from a simple peasant bread recipe, a testament to focaccia’s timeless appeal. Don’t fear the process! Whether changing the yeast amounts, trying longer, slower rises at room temperature or in the refrigerator, the results are consistently delicious.
What Makes The Best Focaccia?
1- Golden Details & the Art of Experimentation
Focaccia’s beauty lies in the details – the way the golden surface looks like a woven, winding labyrinth with deep crevices perfect for olive oil. I love experimenting in the kitchen, and that’s what makes the best focaccia! Understanding the “why” behind certain techniques is just as important to me as the results.
2- The Magic of High-Hydration & Cold Fermentation
Let’s talk high-hydration, refrigerated dough. This is where the magic happens, and many bakers preach its virtues. That long, cold fermentation process, reminiscent of past-prime Jim Lahey refrigerated dough, is ideal. However, focaccia isn’t pizza dough. Unlike pizza, we don’t aim for a tight gluten structure; we want those airy bubbles.
3- The Essential Rise & Flavor Development
After mixing, place the dough in a well-oiled pan and let it rise until it almost doubles. Then, the fun part: drizzle generously with olive oil, dimple it thoroughly with your fingers, and sprinkle with coarse sea salt. Bake it hot, and that’s where the golden crust forms.
4- The Refrigerator: Your Secret Weapon
Here’s where the refrigerator rise changes everything. It takes time – the cold environment slows down the yeast, giving the dough complexity and character. After shaping, a second rise at warm room temperature is important, but it’s the first rise that’s key. This is mostly hands-off effort, and the result is a light, airy, pillowy dough that shatters expectations. While refrigerating your high-hydration dough (which has a high proportion of water to flour) creates those large, desirable air pockets, it can make the dough sticky. A little extra flour when shaping can help! Remember, good focaccia is excellent pizza dough but maybe not the best sourdough sandwich bread. It’s all about the purpose.
How This Focaccia Recipe Differs from Others
There are lots of focaccia bread recipes out there, so why make this one? This one stands out due to two key factors: the long, cold, refrigerator rise and the complete absence of sugar, honey, maple syrup or any kind of sweetener.
You might be surprised about the lack of sweetener in this recipe. Contrary to popular belief, yeast doesn’t actually need sugar to activate and thrive. Sugar will speed things up, but when you’re employing a long, slow rise, speed isn’t the name of the game. Let’s get a bit scientific – during cold fermentation, enzymes in the flour break down starches into simple sugars. This feeds the yeast, develops amazing flavor, and contributes to that beautiful browning. So, added sugar is actually unnecessary here!
Four Tips for Success
- Embrace the Fridge Rest: Allowing your dough to rest for several hours in the fridge yields the best results for that airy, pillowy texture. You can even leave the dough in the fridge for up to 72 hours!
- Prevent Sticking: Use a buttered or parchment-lined pan in addition to plenty of olive oil. This is especially essential when using Pyrex or other glass pans. I love a good USA Pan for even baking.
- Manage Your Rise: The second rise after shaping is best done at room temperature. The exact time needed will vary depending on your kitchen’s temperature and the time of year. Watch for the dough to become puffy again.
- Dimple Power: Don’t skip dimpling the dough thoroughly before it goes into the oven. This step is critical for creating those desirable crevices to hold all that delicious olive oil. For flaky, coarse sea salt, sprinkle it after a light drizzle of olive oil so it has something to dissolve into and stick to.
Nutritional information
| Nutrient | Amount |
| Calories | 208 |
| Fat | 7g |
| Saturates | 1g |
| Carbs | 31g |
| Sugars | 0g |
| Fiber | 1g |
| Protein | 5g |
| Salt | 1.2g |
Ingredients & Details
Flour
Both bread flour and all-purpose flour work for this recipe. The choice depends on your environment and what’s readily available; bread flour may be more common abroad.
Yeast
SAF Instant Yeast is a reliable favorite, but active dry yeast will also work. If using active dry, check your recipe box instructions, as you might need to bloom it in warm water first.
Salt
Salt is essential for any good loaf of bread! The amount may need slight adjustment based on your preferred saltiness and the type of salt you use. If you want that seasoned bakery feel, sprinkle flaky sea salt on top too! Just be mindful–some flaky varieties are larger than fine-grain salt; you may want to use slightly less to avoid over-salting your focaccia dough. I prefer Diamond Crystal kosher salt for its mild flavor.
Water
This is where much of the magic happens! High-hydration doughs are worth venturing into. They result in those beautiful air pockets and a tender crumb.
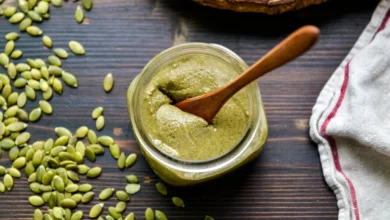
Olive Oil
Don’t skimp on quality! Olive oil is both in the dough and drizzled on top for browning and delicious flavor.
Seasonings & Toppings
This is your chance to get creative! Rosemary is a classic focaccia topping, as are olives, sun-dried tomatoes, and other flavorful ingredients. Experiment and find your favorites!
How to Make Focaccia Bread
Cuisine: Italian12-16
servings20
minutes25
minutes200
kcal45
minutesHere are the details you need to make focaccia bread.
Ingredients
4 cups (512 g) flour (bread flour or all-purpose)
2 teaspoons (10 g) salt
2 teaspoons (8 g) instant yeast (SAF is my preference)
2 cups (455 g) water
Olive oil for drizzling, plus extra for oiling the pan
Directions
- Mix the Dough: In a large bowl, whisk together the flour, salt, and yeast. Gradually add the water and stir with a spatula until a sticky, shaggy dough forms.
- First Rise: Lightly oil a separate bowl. Transfer the dough to the oiled bowl and cover it tightly. Place in the fridge to rise for at least 8 hours. Dough can rise for longer, even up to a few days.
NOTE: The bowl should be slicked with olive oil. Use a cloth bowl cover, tea towel, plastic wrap, or a lid. If you have a 4-Qt Pyrex bowl, it is perfect for fridge storage and stacking. - Shape: Remove the dough from the fridge and uncover. Deflate gently, then transfer the dough to your prepared pan (a 9×13-inch USA pan is ideal, but pie plates or other glass baking dishes can work too). Grease the pan with butter or oil (about a tablespoon should suffice). Ensure the dough has a light touch of oil. It should spread naturally, depending on its consistency and your environment.
- Dimple and Season: Drizzle the dough generously with olive oil. Sprinkle with salt (flaky sea salt adds a nice touch!). If you like, add rosemary or other toppings. Use your fingers to press and create deep dimples all over the dough. (For visual reference, you can find photos online of how dimpled focaccia dough should look before baking).
- Bake: Transfer the pan to the oven and bake at 425 ºF (218 °C) for 20–25 minutes, or until the focaccia is golden brown. Let it cool slightly in the pan before transferring to a cooling rack.
Notes
- Flour Choice: Bread flour yields a chewier focaccia, but all-purpose flour works in a pinch. Experiment and see what you prefer!
- The Dimple is Key: Don’t skip dimpling the dough thoroughly before baking. This creates those delicious pools for olive oil.
- Customize Your Toppings: Rosemary is classic, but get creative with other herbs, fresh vegetables, olives, cheeses – the possibilities are endless!
- Make it a Sandwich: Focaccia is fantastic for sandwiches. Slice it horizontally and fill it with your favorites.
- Storage: Focaccia is best enjoyed fresh the day it’s made. You can store leftovers wrapped tightly at room temperature for a day or two. To refresh, lightly toast slices in the oven or a toaster oven.
Tips for Fluffy Focaccia
- Hydration is Key: A high-hydration dough (with a higher ratio of water to flour) creates those lovely air pockets and a tender interior.
- Long, Cold Rise: Refrigerating your dough overnight slows down the yeast, developing flavor and giving the gluten structure time to relax, leading to a lighter, airier crumb.
- Gentle Handling: After the first rise, handle the dough as little as possible to avoid deflating it.
Focaccia Toppings: Flavor Your Bread
Focaccia bread is incredibly versatile, making it a delicious canvas for toppings and ingredients. Here are some frequently asked questions and two ways to add the flavors you love:
When do I add rosemary and other herbs?
The key is to ensure your herbs are slicked lightly with olive oil to prevent them from burning in the oven. You have two options:
- Sprinkle and Drizzle: Sprinkle herbs over the dough, then drizzle with olive oil before dimpling.
- Mix Right In: When preparing your dough in step one, whisk together the flour, salt, and instant yeast, then add your desired ingredients – such as chopped olives, sun-dried tomatoes, roasted garlic. Toss to coat the ingredients, then proceed with adding the water.
Turn Your Focaccia into Edible Art
Focaccia bread art is a delicious and visually stunning trend! Imagine a “Garden Scape” or an “Ode to Spring” pictured on your next loaf. The key is thoughtfully arranging toppings that have been slicked lightly with olive oil to prevent them from charring in the oven.
Here’s how to incorporate it into your recipe:
- After the Dimple: Once you’ve followed the recipe steps and dimpled your dough before baking, it’s time to get creative!
- Arrange Your Design: Use sliced peppers, asparagus, scallions, olives, tomatoes, onions – get imaginative with colors and shapes!
- Dimple Again: Lightly dimple the dough a second time, gently pressing the toppings to slightly embed them. Don’t be too aggressive, or you’ll deflate the dough.
- Finishing Touches: Brush the entire surface of the dough with olive oil and sprinkle with flaky sea salt.
- Bake: Follow the baking instructions in your recipe, and enjoy your edible masterpiece!
Possible Recipe Variations
- Garlic Infusion: For a burst of garlicky flavor, add finely minced garlic to your dough. A large clove or two of fresh garlic will do the trick!
- Parmesan Delight: Sprinkle grated Parmesan cheese on top of your focaccia before baking for a cheesy, savory twist.
- Herb Exploration: Customize your focaccia with fresh herbs like rosemary, tarragon, or sage. You have two options:
- Knead it In: Add chopped fresh herbs or dried herbs directly to the dough during the initial mixing.
- Sprinkle and Bake: Sprinkle your herbs on top after dimpling to prevent them from burning in the oven.
Focaccia Bread Sandwiches
One of my favorite things to do with focaccia is to turn it into a giant sandwich! Here’s how:
- Rounds or Slabs: This works with either round loaves or a 9×13-inch slab of focaccia.
- Slice it Up: Simply halve the finished loaf of focaccia crosswise.
- Get Creative: Fill your sandwich with whatever your heart desires!
- Serve and Enjoy: Close the sandwich, then slice and serve for delicious and satisfying eats.
Tomato Focaccia
Tomato focaccia is the perfect way to celebrate the freshness and brightness of summer produce. The vibrant pop of tomatoes adds a juicy sweetness that’s beautifully offset by the savory notes of your classic focaccia base.
Tomato Tips:
- Variety is Key: Experiment with different types! Diced cherry tomatoes, sliced Roma or plum tomatoes, or even colorful heirloom varieties all work beautifully.
- Prep with Care: If using large tomatoes, take a moment to seed them. This prevents excess juices from lingering on your focaccia.
- Top It Off: Arrange your tomato slices over the unbaked focaccia, creating a thin, even layer. Bake as directed in your recipe.
Flavor Inspiration: Tomato focaccia pairs well with classic additions like olives, capers, or even a sprinkle of salty anchovies (similar to a pissaladière) for a delicious flavor contrast.
Focaccia Recipe Overnight
While the long, refrigerated rise creates the most pillowy focaccia, you can certainly make a delicious loaf without it. While the finished bread won’t be quite as light and airy, it’ll still be absolutely delicious.
Here’s how to make the quicker version: skip the overnight rise and instead let your dough rise at room temperature until it has doubled in size (this usually takes 1.5 to 2 hours). Then, proceed with the rest of the recipe as planned, allowing about 30 minutes for your second rise before baking.
Yeast-Free Alternatives
While most focaccia recipes rely on yeast for the rise, there are yeast-free variations. These typically use baking powder or baking soda as a leavening agent. Keep in mind that the texture and flavor will differ from classic focaccia.
RELATED: Can You Freeze Sourdough Bread
RELATED: Can You Freeze Banana Bread
Conclusion
Focaccia is a celebration of simple ingredients and hands-on baking. Whether you’re a beginner baker or an experienced bread enthusiast, the joy of homemade focaccia, with its pillowy texture and olive oil-crisped crust, is undeniable. So, let your dough rest, embrace those dimples, and enjoy the delicious journey!
________________________________
Frequently Asked Questions
How is focaccia different from bread?
Focaccia is typically ½” to 1″ thick with a light crust, while most breads have a thicker crust all around. It’s often called “flatbread,” but is surprisingly thick and fluffy.
What are the main ingredients in focaccia?
Focaccia is a leavened, oven-baked Italian dish made with flour, yeast, olive oil, water, and salt. Many recipes include other seasonings or toppings, like cheese.
What flour is best for focaccia?
Bread flour is ideal due to its high protein content. This helps create a chewy interior and a crisp crust. Cold-fermenting the dough overnight develops a complex flavor and a beautiful rise.
Is focaccia bread healthier?
Focaccia often has an advantage due to its use of extra-virgin olive oil, which is full of good fats. Other baked goods may use lard, butter, palm oil, or less-healthy hydrogenated fats. While bread in excess isn’t the healthiest choice, olive oil does tip the scales in focaccia’s favor.