Freezing gnocchi is a simple way to always have potato dumplings on hand for a quick and easy meal. Homemade gnocchi made from potato, flour, egg, and a touch of salt can easily be formed into distinct little nuggets and then frozen raw on a baking sheet until solid. Once frozen, the gnocchi can be transferred to a labelled freezer bag for up to 3 months. When ready to eat, the gnocchi can be boiled directly from frozen in salted water for just a few minutes until they rise to the surface with a light, squidgy texture.
Boiling frozen gnocchi is my preferred method, as it ensures they maintain their pillowy interior without becoming overly tough or chewy. But for variety, frozen gnocchi can also be roasted or baked straight from the freezer. A quick toss in olive oil or melted butter followed by 15 minutes in a 400°F (204°C) oven results in gnocchi with a crisp exterior and the same potato-like flavour I love. Scattering some fresh herbs or grated Parmesan cheese over top takes it to the next level. Freezing homemade gnocchi makes it easy to enjoy their comforting taste even on busy weeknights without having to make the dough from scratch each time.
Contents
- How To Freeze Gnocchi
- Can You Freeze Gnocchi?
- Do Gnocchi Freeze Well?
- How To Freeze Gnocchi
- Freezing Cooked Gnocchi
- Freezing Leftover Gnocchi
- How Long Can You Freeze Gnocchi for?
- How to Defrost Gnocchi
- Can You Refreeze Gnocchi?
- Making Gnocchi
- What is Gnocchi made of?
- What Type of Potato Should You Use?
- What Equipment Do I Need?
- Can I Make Gnocchi Ahead of Time?
- 3 Ways to Cook Gnocchi
- How to Serve Gnocchi
- Basic Gnocchi Recipe
- 5 Gnocchi Recipe Ideas:
- NUTRITION
- Frequently Asked Questions
- Does gnocchi freeze well?
- How do you store fresh gnocchi in the freezer?
- Can you freeze and reheat gnocchi?
- Should I defrost frozen gnocchi before cooking?
- Can you freeze gnocchi from a packet?
- Can you freeze cooked gnocchi with sauce?
- Do you cook gnocchi before freezing it?
- How do you store gnocchi after cooking?
- Can you freeze gnocchi soup?
- How to Cook Frozen Gnocchi?
How To Freeze Gnocchi
We will now explore different ingredients, ways to make and store. Everything we need to know starts here!
Can You Freeze Gnocchi?
Whether you can freeze gnocchi is a common question, and the answer is yes – both uncooked gnocchi dough and cooked leftovers can safely be preserved in the freezer. In fact, freezing is an excellent way to preserve homemade gnocchi for later use, which can be particularly helpful when you’ve made a big batch. When portioning gnocchi into freezer bags, be sure to squeeze out excess air before sealing and laying them flat to freeze. This prevents them from sticking together in a big clump. Come weekly meal prep or busy nights, having homemade gnocchi awaiting just a quick boil is a real time saver. Just be sure to label bags with contents and date. The main things to keep in mind when freezing gnocchi are using high-quality ingredients and packaging them properly to maintain quality and prevent damage or loss of texture over long periods in the freezer.
Do Gnocchi Freeze Well?
The good news is that homemade Gnocchi indeed freezes well, making it easy to preserve batches made with your own hand. Both uncooked and cooked gnocchi freeze, helping you preserve the labor of love for later use. Properly packaged and frozen promptly after preparation or cooking, gnocchi maintains its integrity over several months in the freezer. In fact, freezing can even help gnocchi freeze with an even lighter and fluffier texture compared to freshly made versions. When properly sealed in frozen storage, homemade gnocchi retains its pillowy texture and delightful flavor with no loss of quality upon reheating. The high starch content works in gnocchi’s favor, allowing it to maintain structure through the freezing and thawing process.
How To Freeze Gnocchi
- Shape the gnocchi dough into small, uniform balls or rolls and place on a baking sheet lined with parchment paper, leaving space between each piece. Allow to firm in the freezer for about 1 hour before transferring to a sealed freezer bag or container for longer term storage.
- Once firm, transfer frozen gnocchi to an airtight freezer bag or container, pressing out excess air before sealing.
- Label the bag or container clearly with the contents and date. Homemade gnocchi dough sealed in the freezer keeps well for up to 3 months.
- Arranging the gnocchi on the baking sheet in a single layer before freezing allows them to firm up without sticking together.
- Freezing in balls or rolls rather than a block or clump makes it easy to break off exact portions as needed for cooking later on.
Freezing Cooked Gnocchi
- Bring a pot of salted water to a boil and cook the gnocchi for 2 to 3 minutes, until they rise to the top.
- Drain cooked gnocchi and spread in a single layer on a baking sheet lined with parchment paper. Allow to cool completely.
- Once cool, place baking sheet of gnocchi in the freezer for 1 hour, or until fully frozen hard.
- Transfer frozen gnocchi to an airtight freezer bag or container, pressing out excess air before sealing tightly.
- Label with the contents and date. Properly stored in the freezer, cooked gnocchi stays fresh for 3 months.
- Individual quick-freezing on baking sheets before bagging prevents clumping so gnocchi don’t stick together in the freezer.
Freezing Leftover Gnocchi
- Allow leftover cooked gnocchi to cool completely to room temperature. This prevents condensation from forming in the freezer.
- Transfer cooled gnocchi to an airtight freezer bag or container, pressing out excess air before sealing.
- Label with contents and date before freezing. Properly stored, leftover gnocchi will maintain quality in the freezer for up to 3 months.
How Long Can You Freeze Gnocchi for?
In general, homemade gnocchi can safely be kept frozen for around three months. Proper labeling of your frozen storage container or bag with the preparation date allows you to easily track how long items have been in the freezer. Over longer periods, quality may slowly deteriorate and gnocchi risks developing freezer burn, which could affect the final texture and flavor. Some sources indicate cooked gnocchi tends to hold up even better quality-wise in the freezer compared to uncooked gnocchi. But both methods work well when properly packaged.
When freezing uncooked gnocchi, it’s important to note it may become slightly affected by the freezing process, causing it to become softer or more mushy upon thawing. The starchy potato dough does tend to absorb water during freezing and thawing. However, it remains totally edible and the flavors are preserved. Just cook the thawed gnocchi very gently, without over-boiling.
If stored correctly in the freezer, even after three months both cooked and uncooked varieties of homemade gnocchi can still be enjoyed with delicious flavor. Just thaw and cook according to package instructions. Properly preserved, your homeade gnocchi can offer comforting eats on even the busiest of nights!
How to Defrost Gnocchi
It’s best to plan ahead and have your frozen gnocchi fully defrosted and ready when craving a quick meal. The day before, simply remove gnocchi from the freezer and transfer to the refrigerator to defrost overnight. This slow method helps the gnocchi thaw evenly without becoming mushy.
For a more last-minute defrost, boil a pot of boiling water and then add the still-frozen gnocchi. Boil for 2-3 minutes, until just thawed through and heated through but still chewy. Be careful not to overcook or the gnocchi may become very mushy or start sticking together.
Either Method will have your homemade gnocchi with the same pillowy texture you expect. Just avoid microwaving frozen gnocchi or thawing at room temperature, which can lead to a soggy interior. With gentle defrosting, your frozen gnocchi is guaranteed to be delicious!
Can You Refreeze Gnocchi?
It is generally not recommended to refreeze food that has undergone thawing. Once frozen items are thawed in the refrigerator or by other method, they should be cooked and consumed within a few days for food safety reasons. When frozen food is thawed, ice crystals begin to form in a way that can damage a food’s structure and texture at a cellular level. Refreezing does not reverse this process and may instead increase further damage and changes in flavor, color, and consistency over time. Repeated freeze-thaw cycles also increase the risk of bacterial growth in foodborne illnesses developing if gnocchi is not promptly cooked after complete thawing.
For the best quality, it’s best to freeze freshly made portions of gnocchi dough or cooked portions that one intends to freeze without subjecting the food to multiple freeze-thaw cycles. That said, some experts note gnocchi refrigerated after an initial thaw and then consumed within a day or two retains adequate texture and flavor quality for most peoples’ tastes. Simply avoid significant storage beyond 2-3 days once begun defrosting in the fridge. For safety reasons, it’s also best avoided refreezing anything for long term storage after an initial thaw.
Portioning dough accurately into bags for single recipe amounts helps reduce waste from freezer burn too. While freezing dough or portions one time does retain adequate qualities, refreezing carries risks without necessarily offering benefits to safety, quality or longevity of storage. So in summary, limiting gnocchi to one freeze cycle is recommended.
Making Gnocchi
What is Gnocchi made of?
Homemade gnocchi is essentially Italy’s version of pasta, but instead of being made solely from wheat dough, it gets its pillowy texture and flavor from another starchy base – potatoes. Traditionally, gnocchi starts by boiling potatoes until very soft, then smashing them while still hot. The riced potato is mixed with bread flour and sometimes eggs to form a not-too-sticky dough.
The dough is then rolled out, cut or shaped. Traditionally gnocchi are formed by hand rolling out small pieces of dough and shaping them with the ridges of a gnocchi board or fork. The ridges allow sauce to clingbetter. Beyond the classic potato-flour-egg combination, creative cooks sometimes add ricers like ricotta cheese, spinach, or pumpkin for exciting variety. Recipes abound online – check Epicurious for some new gnocchi ideas to try at home and then freeze extra batches.
What Type of Potato Should You Use?
There are a few key things to consider when choosing the potato variety for making gnocchi. Using the wrong variety can negatively affect both the flavour and texture of the finished gnocchi.
Waxy potatoes like Charlotte or Jersey Royals contain less starch and more moisture, which makes for a dense heavy gnocchi. Floury varieties like Maris Piper or King Edwards are generally considered more ideal as they have a medium floury texture when mashed that works well.
While some recipes call for alternatives like sweet potatoes, swede, or parsnips, a classic white potato will give the best results texture-wise. Of course, feel free to sub in other roots if a specific recipe calls for it, just be aware it may alter the texture slightly.
For the overall texture, it’s best to use potatoes with low moisture content. Peeling and boiling potatoes with their skins on until perfectly soft but not watery in texture leads to fluffier gnocchi. Some prefer baking potatoes in their jackets for an even drier flesh that makes for lighter dumplings.
What Equipment Do I Need?
- Potatoes – Russet or Yukon Gold potatoes work best for gnocchi dough.
- Potato ricer or masher – A ricer does a great job pressing cooked potatoes through without overworking or over-mashing them, which could make the gnocchi heavy.
- Bowl – To mix potato rice/mash with flour and eggs.
- Rolling pin (optional) – For rolling dough thinly before shaping.
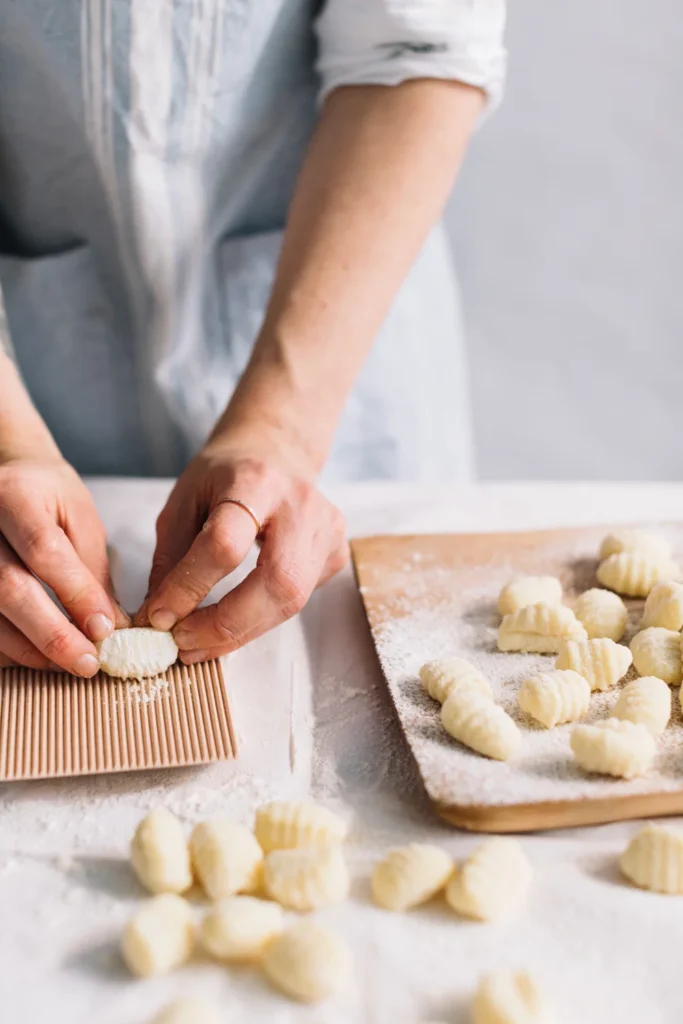
- Gnocchi board, fork or cheese grater – To form traditional ridged shapes. A gnocchi board or the tines of a fork are pressed into rolled pieces of dough. A grater can also be used for a textured imprint.
- Baking sheet – For laying out formed gnocchi to freeze separately before bagging.
- Parchment paper – To line baking sheets and prevent sticking.
- Freezer bags or airtight containers – For storing frozen gnocchi batches.
- Sieve – For draining cooked gnocchi after boiling.
Can I Make Gnocchi Ahead of Time?
It is possible to make fresh gnocchi dough up to 6 hours ahead and store it in the refrigerator. Any longer and the uncooked gnocchi may turn an unpleasant grey color and develop a softer texture.
However, you can absolutely make gnocchi ahead of time and freeze the already formed little dumplings for future use. To do so, arrange gnocchi in a single layer on two lightly floured baking sheets. Cover with cling film and freeze until solid, usually 2 hours. Then transfer to heavy-duty sandwich bags labelled with contents and date. Gnocchi will keep frozen for up to 2 months.
When ready to cook, boil gnocchi straight from the frozen state in a pan of simmering water. They’ll bob up to the surface within 2–3 minutes, fully cooked and ready to be tossed with sauce.
3 Ways to Cook Gnocchi
- Simmer in water: Bring a large pan of lightly salted water to a boil. Add fresh or frozen gnocchi and simmer for 1-2 minutes, until they rise to the surface. Drain well and toss with your desired sauce. This is arguably the easiest way to cook gnocchi.
- Pan-frying: For beautifully crisp, golden gnocchi, simmer and drain as usual, then toss with a little butter in a baking sheet. Heat a medium-sized pan over medium heat and fry gnocchi until deep golden brown on both sides.
- Roasting in the oven: Toss drained, room temperature gnocchi with olive oil and spread out in a single layer in a roasting tin. Bake at 220°C/200°C fan/gas 7 for 20–25 minutes, stirring occasionally, until gnocchi are golden and slightly crisp on the edges and bottom. This achieves an al-forno style sauce.
How to Serve Gnocchi
Tossed with Sauces
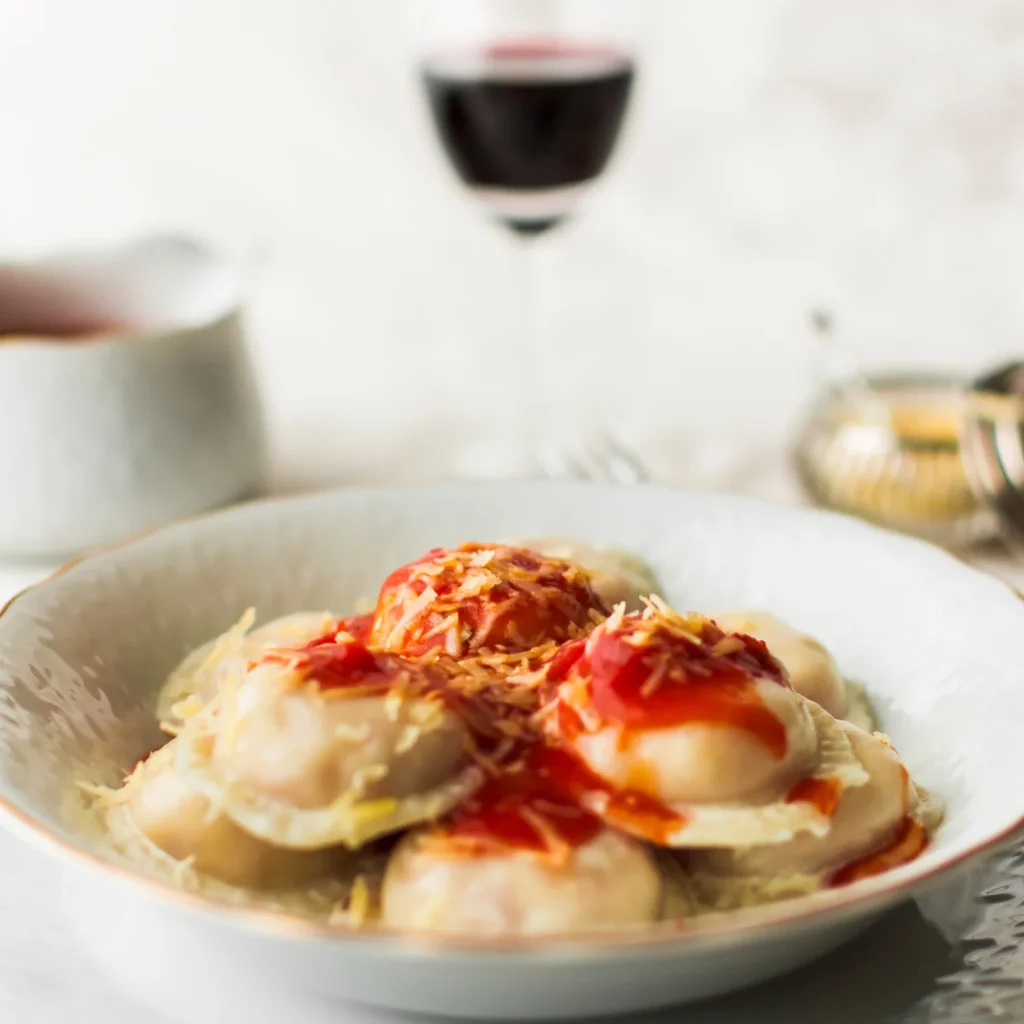
Gnocchi are delicious when tossed with classic Italian sauces like a rich ragu or fresh tomato sauce. You can also bake them “al forno” style by topping boiled gnocchi with sauce and cheese before putting in the oven until hot and molten.
Browned Butter and Sage
A classic way to serve gnocchi is to toss the boiled pasta in a pan with seasoned, melted butter. Melt a knob of butter in a warm, large frying pan over medium heat. Once foaming and nutty smelling, add boiled gnocchi and fry for about 1 minute while tossing. Remove from heat and add a tablespoon of browned butter. Sprinkle with fresh sage.
Olive Oil
Tossing boiled gnocchi with good-quality extra virgin olive oil makes for a simple preparation that lets the fresh pasta shine. Season well with salt and black pepper. Enjoy the fantastic texture on its own.
Basic Gnocchi Recipe
| Ingredients |
| 1 kg of starchy potatoes like Maris Piper or King Edward |
| 1 medium egg, lightly beaten |
| 200-250g plain flour |
Instructions:
- Peel the potatoes and cut into evenly sized cubes. Add to a pot of salted water and boil until tender when pierced with a fork.
- Drain the cooked potatoes well and rice or mash them onto a clean work surface. Allow to cool slightly.
- Make an indentation in the centre of the mashed potatoes and carefully crack the egg into the hollow.
- Gradually mix the flour into the potatoes and egg, kneading together lightly to form a dough.
- Pinch off pieces of dough and roll each into a long rope about 1 cm thick. Cut into 2 cm sections.
- Use a ridged gnocchi board or fork tines to imprint ridges onto each dough piece.
- Fill a large saucepan with water, add salt, and bring to a rapid boil over high heat.
- Add gnocchi to the boiling water in batches and boil for 2-3 minutes until floating.
- Remove gnocchi with a slotted spoon and toss with your favorite pasta sauce. Enjoy your homemade gnocchi!
5 Gnocchi Recipe Ideas:
- Parsnip Gnocchi: Take this root vegetable gnocchi recipe to the next level by topping with a crunchy walnut crumb.
- Swede Gnocchi: An overlooked gnocchi variety that is budget-friendly and restaurant-worthy as a main course when butter-fried with fresh herbs.
- Baked Gnocchi with Tomatoes and Mozzarella: A delicious and easy midweek meal of homemade gnocchi baked with tomatoes, fresh mozzarella, capers and olives.
- 10 Minute Fish and Gnocchi Supper: A quick and nourishing supper full of omega-3 oils and vitamin C when you turn fresh gnocchi and fish into a rich one-pan dish.
- Gnocchi with Blue Cheese and Mushrooms: Pair homemade gnocchi with a creamy blue cheese sauce and earthy portobello mushrooms for a delicious dinner that comes together in just 20 minutes.
NUTRITION
Per 1 cup (156g) serving
| Nutrient | Amount |
| Calories | 211 kcal |
| Carbohydrates | 42.6g |
| Protein | 6.6g |
| Fat | 1.5g |
| Saturated Fat | 0.4g |
| Cholesterol | 41 mg |
| Sodium | 24 mg |
| Potassium | 556 mg |
| Fiber | 3.8g |
| Sugar | 1.6g |
| Calcium | 22 mg |
| Iron | 2 mg |
Read this about nutrition:
As a potato-based pasta, gnocchi is high in carbohydrates but also provides protein, fibre, and some important vitamins and minerals. It makes a nourishing meal while being lower in fat than many other pasta dishes. Pay attention to portion sizes and what sauce it’s served with to keep the calorie and saturated fat counts in check.
Conclusion
Gnocchi freezes wonderfully and provides a convenient homemade meal option for busy nights. Whether homemade or store-bought, freezing gnocchi raw or cooked extends its shelf life for several months. With minimal extra cooking time, frozen gnocchi maintains its tender texture and allows you to enjoy this versatile pasta all year round. With the proper freezing and storing methods outlined above, gnocchi can be part of your meal planning solution.
For more recipes about Culinary Lifestyle, Meals and Drinks and Desserts, check our rest of the blog.
Frequently Asked Questions
Does gnocchi freeze well?
Yes, gnocchi can be successfully frozen. To freeze gnocchi, space it out in a single layer on a baking tray and freeze, then transfer to labelled freezer bags or a container. Freeze for up to 3 months.
How do you store fresh gnocchi in the freezer?
Place flour-dusted fresh gnocchi onto a baking sheet in a single layer and freeze. Once solid, transfer to an airtight freezer container to prevent sticking. Label with the date.
Can you freeze and reheat gnocchi?
Yes, frozen gnocchi can be cooked from frozen. Bring a large pot of salted water to a boil, add frozen gnocchi, and cook until they float to the top, about 2-3 more minutes than fresh.
Should I defrost frozen gnocchi before cooking?
While defrosting is not required, it may help prevent clumping. To defrost, place gnocchi in a single layer in the fridge overnight. Cook as you would fresh gnocchi, adding a minute or two more to the cooking time.
Can you freeze gnocchi from a packet?
Yes, pre-packaged store-bought gnocchi can also be frozen for future use. Place gnocchi in a single layer on a baking sheet and freeze until solid, about 2 hours, then transfer to an airtight freezer bag or container. Freeze for up to 3 months and cook directly from frozen, adding 1-2 minutes to the cooking time. This allows you to stock up when gnocchi goes on sale.
Can you freeze cooked gnocchi with sauce?
Yes, fully cooked gnocchi can be frozen with your favorite sauce. Place the hot gnocchi and sauce into a freezer-safe container, allowing room for expansion, and freeze for up to 3 months. The sauce prevents gnocchi from sticking together. When reheating, thaw in the fridge overnight and reheat in the sauce until hot throughout.
Do you cook gnocchi before freezing it?
No, gnocchi should not be cooked prior to freezing. Freeze gnocchi uncooked, either fresh or from a package, and then cook directly from the frozen state when ready to eat. Cooking ahead of time can cause the gnocchi to become soggy or break down more quickly when frozen for long periods.
How do you store gnocchi after cooking?
Leftover cooked gnocchi can be covered and refrigerated for 3-4 days. To freeze, place cooled gnocchi in an airtight container with sauce if using, and freeze for up to 3 months. When reheating frozen gnocchi, add it directly to a pan with a little water or sauce and heat through.
Can you freeze gnocchi soup?
Yes, soups with gnocchi in them can be frozen for up to 3 months. Simply cool the soup completely, then transfer to freezer safe containers, leaving headspace for expansion. The gnocchi will hold up well after freezing.
How to Cook Frozen Gnocchi?
Frozen gnocchi can be conveniently cooked straight from the freezer. Bring a large pot of salted water to a boil over high heat. Once boiling, add the frozen gnocchi gently to the water. Return to a boil and cook for 2-3 minutes, until the gnocchi floats to the top and is tender when bitten. Use a slotted spoon to transfer the gnocchi directly to your serving dish. Top with your desired sauce and serve immediately. The additional minute or two of cooking time ensures the gnocchi is fully heated through after being frozen. Frozen gnocchi can also simply be added directly to a hot pan with a small amount of water or sauce and cooked through.